第13章:Firestore詳細フォームで更新できるようにする 📝🛠️
この章は「管理画面っぽい動き」のど真ん中です😆✨ 一覧の1行をクリック → 詳細ページへ → フォーム編集 → 保存 → 一覧に戻って反映まで通します🚀
まず全体像(ここだけ覚えれば勝ち)🧠✨
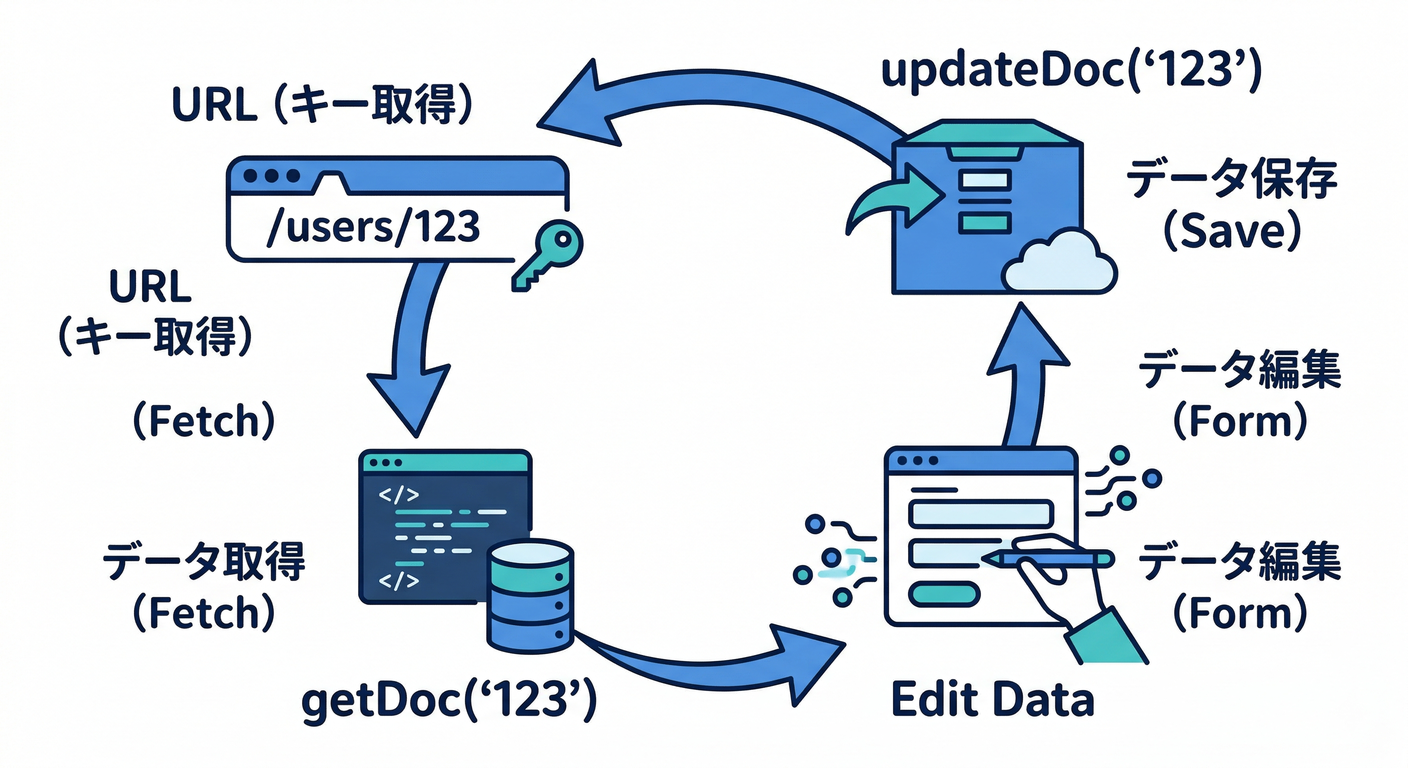
詳細フォーム更新は、この3点セットで回ります👇
- URLにドキュメントIDを入れる(例:/users/abc123)
- IDで1件取得 → フォームに流し込む(getDoc)
- フォームの値で更新する(updateDoc)
React Router の「URLからIDを取り出す」仕組みが useParams です📦 「/posts/:postId みたいな動的パラメータが、params で取れる」って公式が言ってます✅ (reactrouter.com)
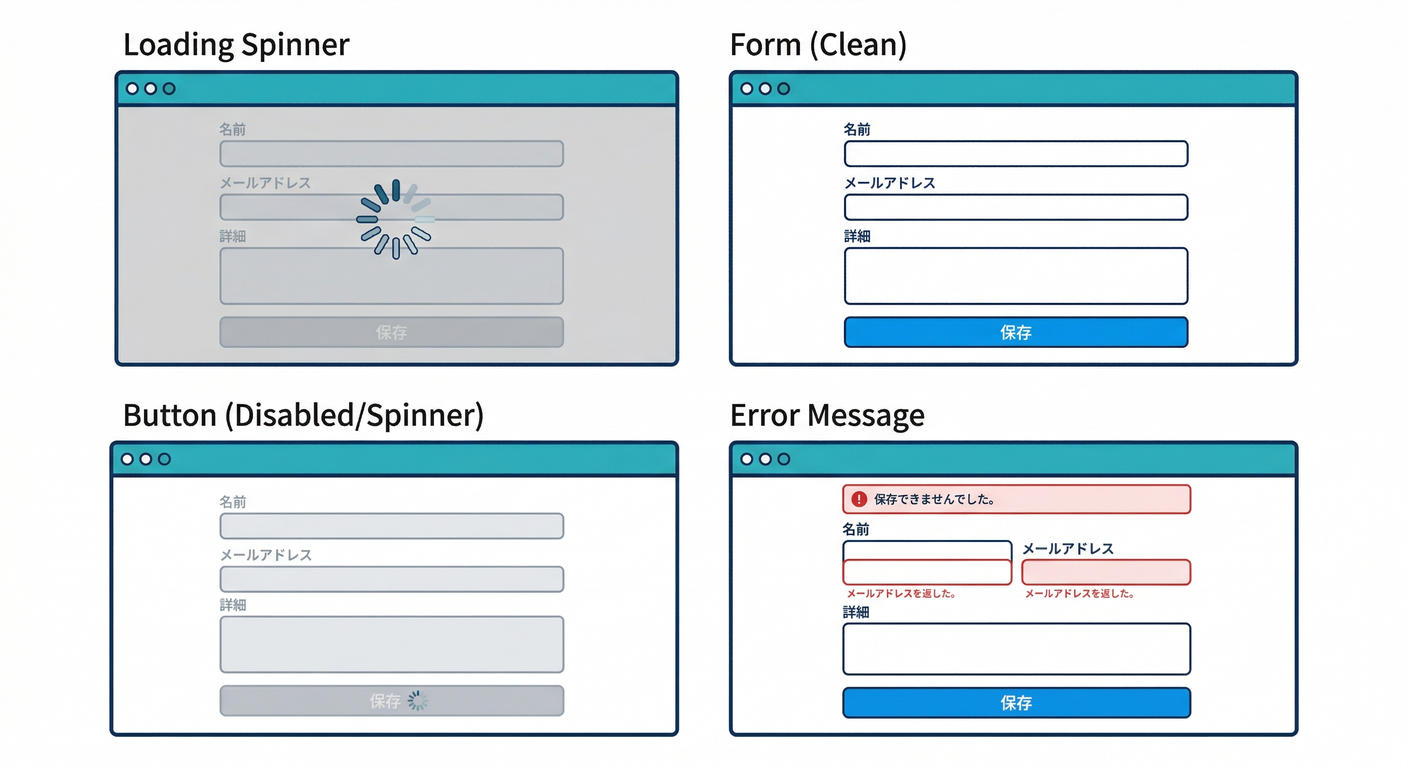
今日作るUI(完成イメージ)🧱✨
- 左:一覧(第12章で作ったやつ)📋
- クリックすると → 右:詳細ページ(編集フォーム)📝
- 保存中はボタン無効&くるくる表示🌀
- 保存成功なら「保存しました!」が出る🎉
- 戻ったら一覧に反映されてる👀✨
Step 1:ルート(URL)を「/users/:userId」にする 🧭
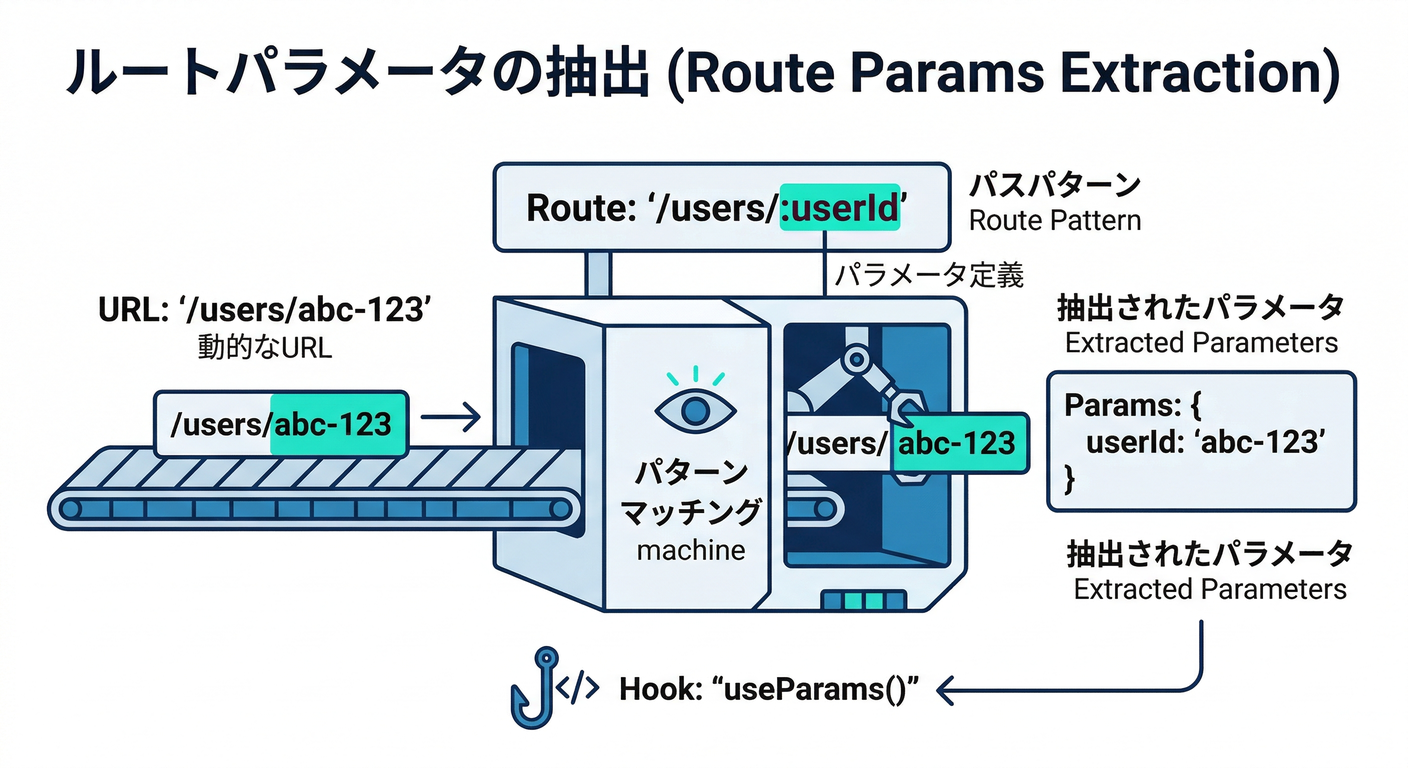
ポイントは :userId みたいな“穴あきURL”です🕳️✨ useParams で userId を取り出せます(公式の説明どおり) (reactrouter.com)
// 例:ルーティング(どの書き方でもOK)
// /users/:userId に UserDetailPage を割り当てる

<Route path="/users/:userId" element={<UserDetailPage />} />
Step 2:一覧の「行クリック」で詳細へ飛ぶ 🖱️➡️
ページ遷移は useNavigate が定番です🚗💨(プログラムで移動できるやつ) (reactrouter.com)
// UserListPage 側(例)

const navigate = useNavigate();

function onRowClick(userId: string) {
  navigate(`/users/${userId}`);
}
Step 3:Firestore “1件取得 → フォーム反映” を作る 🗃️📝
Firestore の基本はこの形👇
- doc(db, "users", userId) で参照を作る
- getDoc で1件取得する (Google Cloud Documentation)
まずは型(TypeScript)を用意しよう ✍️
// src/features/users/types.ts

export type UserRole = "admin" | "editor" | "viewer";

export type UserDoc = {
  displayName: string;
  role: UserRole;
  bio?: string;
};
Firestoreアクセスは “service” に寄せる(超おすすめ)📦✨

画面に直書きすると散らかります😵💫 「Firestore操作は usersService に集める」と、後で泣かないです👍
// src/features/users/usersService.ts
import { db } from "../firebase"; // 第10章で作ったやつ想定
import { doc, getDoc, updateDoc, serverTimestamp } from "firebase/firestore";
import type { UserDoc } from "./types";

// 1件取得
export async function getUser(userId: string): Promise<UserDoc | null> {
  const ref = doc(db, "users", userId);
  const snap = await getDoc(ref);
  if (!snap.exists()) return null;
  return snap.data() as UserDoc;
}

// 更新(部分更新)
export async function updateUser(userId: string, patch: Partial<UserDoc>) {
  const ref = doc(db, "users", userId);

  // updateDoc は「必要なフィールドだけ更新」できるのが良いところ✨ :contentReference[oaicite:4]{index=4}
  await updateDoc(ref, {
    ...patch,
    updatedAt: serverTimestamp(), // “更新日時はサーバー基準”にできる✊ :contentReference[oaicite:5]{index=5}
  });
}
※「もしドキュメントが無いなら作りたい(いわゆるupsert)」なら、set(merge)で“無ければ作る”ができます🧩 (Google Cloud Documentation) (この章は管理画面なので、普通は「既にあるユーザーを編集」が多い想定で update を採用)
Step 4:UserDetailPage(詳細フォーム)を作る 🧑💻✨
ここが本番です🔥 状態は第7章の “loading / error / data” でいきます🔁
// src/features/users/UserDetailPage.tsx
import { useEffect, useMemo, useState } from "react";
import { useNavigate, useParams } from "react-router-dom";
import type { UserRole } from "./types";
import { getUser, updateUser } from "./usersService";

type FormState = {
  displayName: string;
  role: UserRole;
  bio: string;
};

export default function UserDetailPage() {
  const navigate = useNavigate();
  const params = useParams(); // URLの :userId を取る :contentReference[oaicite:7]{index=7}
  const userId = params.userId;

  const [loading, setLoading] = useState(true);
  const [saving, setSaving] = useState(false);
  const [error, setError] = useState<string | null>(null);
  const [message, setMessage] = useState<string | null>(null);

  const [initial, setInitial] = useState<FormState | null>(null);
  const [form, setForm] = useState<FormState>({
    displayName: "",
    role: "viewer",
    bio: "",
  });

  const isDirty = useMemo(() => {
    if (!initial) return false;
    return (
      initial.displayName !== form.displayName ||
      initial.role !== form.role ||
      initial.bio !== form.bio
    );
  }, [initial, form]);

  useEffect(() => {
    if (!userId) {
      setError("URLのIDが見つからないよ…😢");
      setLoading(false);
      return;
    }

    (async () => {
      try {
        setLoading(true);
        setError(null);

        const data = await getUser(userId);
        if (!data) {
          setError("ユーザーが見つからないよ…(削除されたかも)🥲");
          return;
        }

        const next: FormState = {
          displayName: data.displayName ?? "",
          role: (data.role ?? "viewer") as UserRole,
          bio: data.bio ?? "",
        };

        setForm(next);
        setInitial(next);
      } catch (e) {
        setError("読み込みに失敗したよ…🔌💥");
      } finally {
        setLoading(false);
      }
    })();
  }, [userId]);

  async function onSave() {
    if (!userId) return;

    // 超ミニバリデーション🚦(第8章の復習)
    if (!form.displayName.trim()) {
      setMessage("表示名は必須だよ🙂(空はダメ)");
      return;
    }

    try {
      setSaving(true);
      setMessage(null);

      await updateUser(userId, {
        displayName: form.displayName.trim(),
        role: form.role,
        bio: form.bio.trim(),
      });

      setInitial({ ...form }); // 保存したので「汚れてない状態」に更新✨
      setMessage("保存しました!🎉");
    } catch (e) {
      setMessage("保存に失敗したよ…(権限 or ネットワークかも)🥺");
    } finally {
      setSaving(false);
    }
  }

  if (loading) return <div className="p-6">読み込み中…🌀</div>;
  if (error) return <div className="p-6 text-red-600">{error}</div>;
  if (!userId) return null;

  return (
    <div className="p-6 space-y-4">
      <div className="flex items-center justify-between">
        <h1 className="text-xl font-bold">ユーザー編集 📝</h1>

        <button
          className="px-3 py-2 rounded bg-slate-200 hover:bg-slate-300"
          onClick={() => navigate("/users")}
        >
          一覧へ戻る ↩️
        </button>
      </div>

      {message && (
        <div className="p-3 rounded bg-slate-100">
          {message}
        </div>
      )}

      <div className="space-y-3">
        <label className="block">
          <div className="text-sm mb-1">表示名</div>
          <input
            className="w-full px-3 py-2 border rounded"
            value={form.displayName}
            onChange={(e) => setForm({ ...form, displayName: e.target.value })}
          />
        </label>

        <label className="block">
          <div className="text-sm mb-1">権限</div>
          <select
            className="w-full px-3 py-2 border rounded"
            value={form.role}
            onChange={(e) => setForm({ ...form, role: e.target.value as UserRole })}
          >
            <option value="viewer">viewer</option>
            <option value="editor">editor</option>
            <option value="admin">admin</option>
          </select>
        </label>

        <label className="block">
          <div className="text-sm mb-1">メモ(自由欄)</div>
          <textarea
            className="w-full px-3 py-2 border rounded min-h-[120px]"
            value={form.bio}
            onChange={(e) => setForm({ ...form, bio: e.target.value })}
          />
        </label>

        <button
          className="px-4 py-2 rounded bg-blue-600 text-white disabled:opacity-50"
          onClick={onSave}
          disabled={saving || !isDirty}
          title={!isDirty ? "変更がないよ🙂" : ""}
        >
          {saving ? "保存中…🌀" : "保存する 💾"}
        </button>
      </div>
    </div>
  );
}

ここで使ってる updateDoc は「必要なフィールドだけ更新」ができるのがポイントです✅ (Google Cloud Documentation) 更新日時を serverTimestamp にすると「クライアント時計ズレ問題」を避けられます⏱️✨ (Google Cloud Documentation)
つまづきポイント集(ここ超大事)🧯🔥
1) “Missing or insufficient permissions” が出る 😭
だいたい Firestoreルールです。 ログイン必須にしてるなら「認証済みユーザーだけ更新OK」になってるか見直し👀
2) 保存しても一覧が変わらない 🤔
- 一覧が “読み直し” しない設計だと、戻っても古いままのことがあります
- 次の第14章で「リアルタイム購読」を入れると気持ちよく解決します⚡✨
3) “上書き事故” が怖い 😱
同時編集があり得るなら、将来は transaction / 更新前チェック(updatedAt比較)へ進化させると堅いです🛡️
🔥おまけ:メモ欄に「AI整形」ボタンを付ける 🤖✨
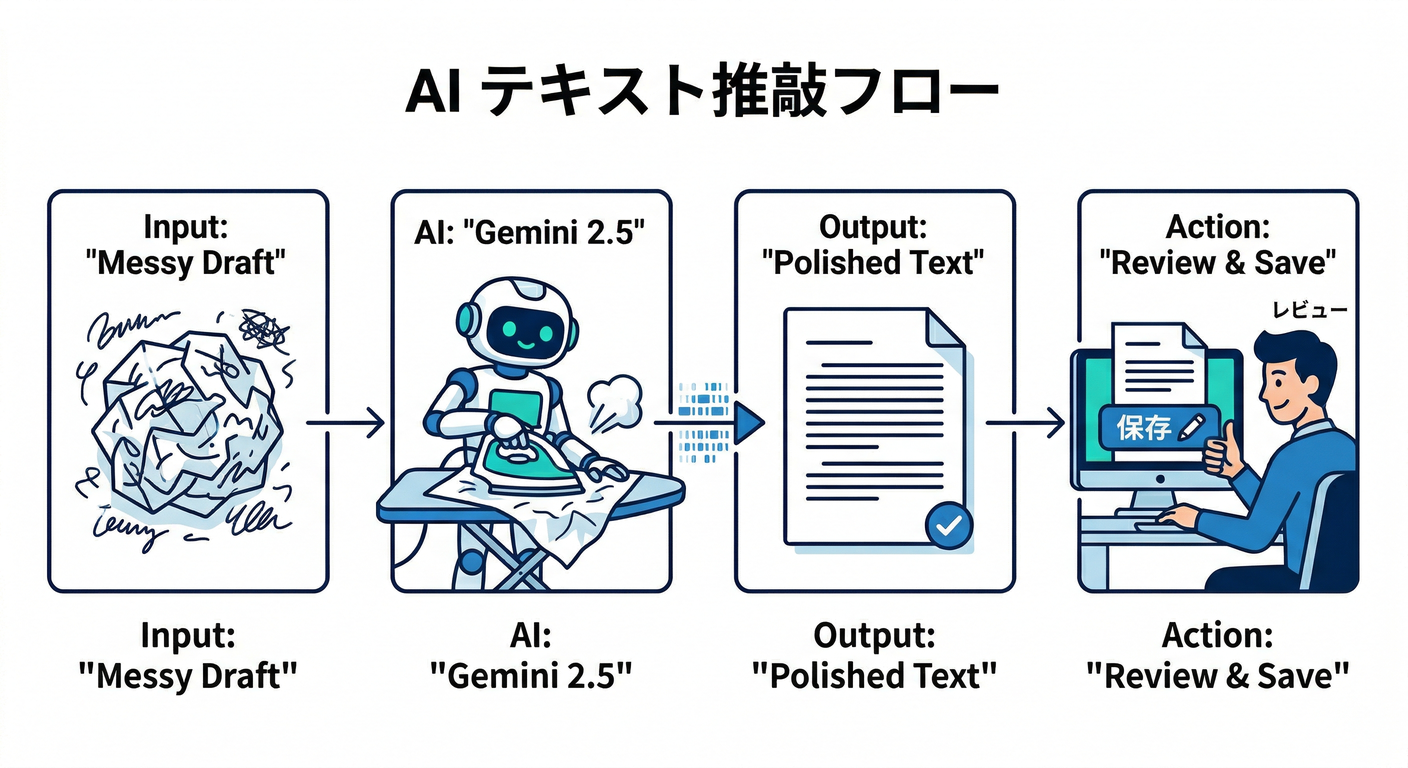
ここで Firebase AI Logic の出番です🎉 Webだと firebase/ai からモデルを呼べます(公式のWeb例がこれ) (Firebase)
さらに、モデル名は gemini-2.5 系が載ってます🧠 (Firebase) そして Gemini 2.0 Flash / Flash-Lite は 2026-03-31 に廃止予定の注意も書かれてます⚠️(今後の教材では2.5系を推し) (Firebase)
// 例:メモを「読みやすく整形」する関数(超ミニ)
// ※ app は firebase 初期化から持ってくる想定

import { getAI, getGenerativeModel, GoogleAIBackend } from "firebase/ai";

export async function polishText(app: any, text: string) {
  const ai = getAI(app, { backend: new GoogleAIBackend() }); // Webの公式例 :contentReference[oaicite:14]{index=14}
  const model = getGenerativeModel(ai, { model: "gemini-2.5-flash-lite" }); // 2.5系が掲載 :contentReference[oaicite:15]{index=15}

  const prompt =
    "次の文章を、意味は変えずに、やさしい日本語で読みやすく整えて。\n\n" + text;

  const result = await model.generateContent(prompt);
  return result.response.text();
}
UI側はこう👇(イメージ)
- 「AI整形」押す
- 返ってきた文章を textarea に入れる
- そのまま保存せず、最後は人間が目で確認して保存👀✅(事故防止)
⚡開発を速くする:Antigravity と Gemini CLI の使いどころ 🛸💻
Antigravity(作業場+AIで爆速)🚀
「クラウドアプリをAIで作るワークスペース」的な立ち位置で、まだ Preview 扱いの教材が出ています📚 (reactrouter.com) この章だと、例えば👇みたいに使うのが強いです💪
- 「UserDetailPage の雛形作って」
- 「loading/error/data の状態を入れて」
- 「保存中はボタン無効にして」
Gemini CLI(ターミナルにいるAIエージェント)🧑🔧🤖
Gemini CLI は ターミナルでGeminiを使えるオープンソースAIエージェントで、ReActループ+MCPサーバーにも触れてます🧠 (Google Cloud Documentation) Cloud Shell だと追加設定なしで使える、という案内もあります☁️ (Google Cloud Documentation) さらに公式ブログでは、プレビュー中の位置づけや使いどころ(コマンド実行、トラブルシュート等)も説明されています🧯 (Google Cloud)
この章での“勝ちパターン”プロンプト例👇
- 「このUserDetailPage、型を強くしてバグ減らして」
- 「保存処理を例外に強くして、ユーザー向けメッセージに直して」
- 「dirty判定をもっと安全にして」
ミニ課題 🎯✨(10〜15分)
-
権限(role)を編集したとき、保存後に 一覧の表示も変わったように見せてみよう👀 (一覧側で role を表示してるなら、戻ったら変化が分かるはず!)
-
“変更がない時は保存ボタン無効” をちゃんと効かせよう🔒 (isDirty が true の時だけ押せる)
チェック✅(できたら合格🎉)
- URLが /users/◯◯ になって、詳細が出る ✅ (reactrouter.com)
- 読み込み中が出る 🌀
- 保存中にボタンが押せなくなる ✅
- updateDoc で更新できる ✅ (Google Cloud Documentation)
- 更新日時を serverTimestamp で入れてる ✅ (Google Cloud Documentation)
- AI整形を付けた場合、2.5系モデルを選んでる ✅(2.0系の廃止予定も把握) (Firebase)
次の第14章で、一覧を onSnapshot 的な「リアルタイム購読」にすると、**“戻った瞬間もう更新済み”**になって気持ちよさが爆上がりします⚡👀✨